I start talking with my class the first of November about being thankful. Before we learn about pilgrims, the Mayflower or Thanksgiving we explore the word 'thankful'.
There are a lot of great children's books out there about being thankful and we we read quite a few. (:
The first thing I ask the class is what does thankful mean. I get lots of guesses such as "When we say thank you" and "Thanks for giving me something". I like to take their answers and show them how they are correct by asking them open ended questions like "What are some things you say 'thank you' for"? or "What is something someone might give you"?
There is a cute book called Thanks for Thanksgiving by Julie Markes. It talks about lots of things big and small to be thankful for like turkey on the table, warm cozy cuddles, dress up clothes and big red hats.
Often times preschoolers think of toys and other tangible things when
asked what they are thankful for. I like to expand their thinking to include people, actions and ideas.
Every day for the month of November we go around the circle and each one of us says something we are thankful for. I try to encourage them to think of something different each day.
This activity came about the middle of the month. I made the turkey the kids provided the leaves and the words. We made lots of feathers for them to cut out and they were allowed to cut as many as they wanted with everyone required to make at least one.
Great practice cutting on curved lines as well. We used lots of fall colored scrapbook and construction paper. The thicker and thinner papers also helped those who were having trouble getting their scissors to work the way they wanted them to. (:
Sunday, November 24, 2013
Tuesday, October 15, 2013
Apple Webbing, PreK Style
A quick K-W-L wrap-up of our apple study.
I gave each child a chance to tell me something they learned about apples during the week.
As you can tell I got some great responses and almost everyone had a unique answer. I did need to prompt a couple of them with questions such as "What do you know about apple trees?' and "Can you think of something we can make out of apples?"
This is always a great study as we always have an apple taste test and graph our responses of which apples each of us like the best. We also enjoy applesauce, apple pie, talk about Johnny Appleseed and take a walk to a small apple orchard that we have on campus.
Saturday, October 12, 2013
Apple Patterning, PreK Style
Preschoolers love painting in any form so when I got out the paint and sponges for this activity I had no problem getting volunteers.
Very simple patterning with apple shaped sponges and long strips of tag board. These sponges were actually kitchen sponges shaped like apples that I found many years ago at a thrift store. I also have a couple shaped like lemons for a little variation in the type of patterns we are doing.
I let the children choose two of the three colors of apples to make their patterns with and put the paper lengthwise in front of each of them. I choose to do this activity one child at a time to ensure each child was successful and understood the concept of A-B patterns. Most were able to complete their pattern with very little help.
For a little challenge with those more advanced children you can use all three colors. A-B-C or an A-B-B pattern.
Tuesday, October 8, 2013
Scarecrows, PreK Style
Thanks for those of you who have been asking me for more blog posts. An unplanned quick trip out of town and time to take a few pictures put me a little behind but I have lots more to share with you. (:
Fall is my absolute favorite time of the year so hopefully you will find something your looking for.
These were from our Scarecrow study last week. I found several different variations of these on Pinterest and came up with my own based on the supplies I had on hand. I suggest you do the same to save time and of course money.
We set this up in two stations. First I wrote the names of each of the kids on the bottom of a brown paper bag. This helps me keep track of who still needs to complete the activity, saves me the struggle of trying to write on the bottom of them after they are completed, plus trying to remember which one belongs to which kid. lol
At the first station each child chooses which shapes to use for cheeks and a nose and glues them on the bag. They also choose eye stickers and drew a mouth from one cheek to the other.
Giving the foam shapes just a couple minutes to dry they were called a few at a time to the second station to complete their scarecrows. I had previously unwound about twenty feet of twisted paper cord and cut it in about 8" pieces and instructed them to cut the paper lengthwise to make the scarecrows hair. Since the hair doesn't need to be precise by any means I gathered what each of them had cut and stapled it across the top of their bags. This is a great cutting activity for those children who are struggling with controlling the scissors. The paper cuts easy and it's okay if the cuts are crooked or jagged. While the kids cut their "hair" I wadded up one full sheet of newspaper and pushed it down into each of their bags.
It all gets stapled shut with a coffee filter hat on top and the kids get to finish them off with sticky flower foam shapes for their hats. I later added the string so we could display them for our upcoming fall festival (:
Great project, the kids loved them. We talked about basic shapes as went along. Our bags were rectangles, eyes and hats were circles and they choose from squares, triangles and circles for the rest of the facial features.
A couple of things I may do different next year: The coffee filters made great hats but next time they will get a little color. Watercolors in nice fall colors will look great on them. We could make our hats a day or two before so they are dry the day we make our scarecrows. The other is to fill the bags with shredded newspapers. Mainly because tearing paper would have been a great fine motor activity for some of my kiddos. Instead of doing this individually I could let the children tear (or cut) paper during the week so it would be ready to grab a handful when we needed it.
Fall is my absolute favorite time of the year so hopefully you will find something your looking for.
These were from our Scarecrow study last week. I found several different variations of these on Pinterest and came up with my own based on the supplies I had on hand. I suggest you do the same to save time and of course money.
We set this up in two stations. First I wrote the names of each of the kids on the bottom of a brown paper bag. This helps me keep track of who still needs to complete the activity, saves me the struggle of trying to write on the bottom of them after they are completed, plus trying to remember which one belongs to which kid. lol
At the first station each child chooses which shapes to use for cheeks and a nose and glues them on the bag. They also choose eye stickers and drew a mouth from one cheek to the other.
Giving the foam shapes just a couple minutes to dry they were called a few at a time to the second station to complete their scarecrows. I had previously unwound about twenty feet of twisted paper cord and cut it in about 8" pieces and instructed them to cut the paper lengthwise to make the scarecrows hair. Since the hair doesn't need to be precise by any means I gathered what each of them had cut and stapled it across the top of their bags. This is a great cutting activity for those children who are struggling with controlling the scissors. The paper cuts easy and it's okay if the cuts are crooked or jagged. While the kids cut their "hair" I wadded up one full sheet of newspaper and pushed it down into each of their bags.
It all gets stapled shut with a coffee filter hat on top and the kids get to finish them off with sticky flower foam shapes for their hats. I later added the string so we could display them for our upcoming fall festival (:
Great project, the kids loved them. We talked about basic shapes as went along. Our bags were rectangles, eyes and hats were circles and they choose from squares, triangles and circles for the rest of the facial features.
A couple of things I may do different next year: The coffee filters made great hats but next time they will get a little color. Watercolors in nice fall colors will look great on them. We could make our hats a day or two before so they are dry the day we make our scarecrows. The other is to fill the bags with shredded newspapers. Mainly because tearing paper would have been a great fine motor activity for some of my kiddos. Instead of doing this individually I could let the children tear (or cut) paper during the week so it would be ready to grab a handful when we needed it.
Sunday, September 22, 2013
Halloween Spider Web Game, PreK Style
This game can be a little challenging for some of your preschoolers but after a few minutes most children pick it up and really have fun with it.
First have your class sit in a large circle and cross their legs and explain the importance of holding on to the yarn when it is tossed to them and not letting go until our web is complete.
Start making your spider web by holding the end of the ball of of yarn and tossing it across the circle to someone you believe will follow the directions. I suggest at this point you call out each name the yarn is to be tossed to next. This will ensure each child is getting a turn and can control the shape and pattern your spider web is taking. Well, as much as possible with a group of preschoolers. lol
Go around your circle as long as the children are engaged or you run out of yarn. I try to start with a full skein of yarn rolled into a ball if possible and we get most of the way through it before something happens.
Our game usually ends when somebody gets bored or silly and lets go... but most things end that way don't they?? (:
Saturday, September 21, 2013
DIY Fall Halloween Stampers, PreK Style
Just the right size for little hands and large enough to keep most of the fingers out of the ink pad.
Made out of foam blocks from the classroom block center and holiday foam stickers. Again, easy to make and fairly cheap materials that most of us already have on hand.
The key to making these stampers is to use two of the same stickers stacked one on top of the other on the bottom of the block. Using two stickers makes it just tall enough to work really well. I have stacked three a couple of times, it just depends on the thickness of the stickers. You can find great packs of the foam stickers around the holidays that have a variety of shapes so you can make lots of different stampers.
I have also cut my own simple shapes out of sheets of scrap foam such as triangles, circles, squares, hearts for Valentine's day, pumpkins, apples, etc.
If you choose to do this just keep in mind that you need to stack them.
If you don't have foam blocks available to mount the stickers on you could use wooden blocks, scrap pieces of wood or even small cans of food such as tomato paste to mount them on.
Hope everyone is having a great weekend!!
Happy Stamping!
(:
Friday, September 20, 2013
Dinosaur Fossils, PreK Style
Making fossils is always a fun way to wrap up your dinosaur study. These are very easy and you probably have everything you need on hand.
Playdough:
Enough to cover 1/2" on the bottom of disposable bowls x the numbers of students you are working with.
Plaster of Paris: You will need about 3/4" on top of playdough for each fossil.
Disposable bowls
A variety of small plastic dinosaurs
I put names on each bowl before I even start the activity. (1 thing I don't have to worry about later).
Working with a small group of 3 or 4 children, give them each a handful of playdough pushing it down flat on the table. Then put it in the bowl making sure it is pressed to the bottom. I usually then flip them over and make sure it covers the bottom so it is a nice smooth surface on top.
Now let each child choose a dinosaur to make a fossil of and help them put the dinosaur on its side and push it into the clay to form a good impression. Slowly pull the dinosaur up to make sure it worked.
After these are ready, mix enough plaster of paris to pour on top of the playdough or wait until all of them are done and make up one large batch. I like to do it in small batches so the kids can help me mix it and pour it. Make sure to follow the dry mix to water ratio so it sits up correctly.
The plaster of paris says it dries to the touch in thirty minutes. I always let ours sit over night to make sure they are completely dry before sending them home.
Don't forget to write names on them as you take them out of the bowls so you don't get them mixed up.
When you are ready, carefully turn them over, they should pop right out. The playdough should peel right off as well. If you have tiny pieces of playdough in cracks and crevices you may need a soft bristle brush to clean them, but it is usually not a problem.
Of course you can use this same process with sea shells or other small objects...
Have a great weekend!
Thursday, September 19, 2013
Daily Sign-In, PreK Style
I like to keep track of who is in the room during the day and with a quick glance this board will let me know. I use laminated name plates for durability and because they are so easy to clean off with a magic eraser if I need to change something.
The beginning of the year is all about name recognition. If your class or individual children are having trouble with this you can add a small picture of the child or a symbol (see High Scope Curriculum) next to the child's name to help with this skill.
Children are taught to use these name cards to help write their names or other children's names. If they need help remembering how to spell their names or want to write a friends name in their writing journal they get the card and take it back to the table where they are writing. When they are finished they return the card to it's proper place.
As children leave for the day, their names are taken off the board.
After Christmas, children use their name cards to help them write their names on a sign-in sheet. More on this process later... (:
Wednesday, September 18, 2013
Great Teacher Gifts
How many coffee mugs and "Number One Teacher" plaques and magnets can we possibly use?
This was a favorite gift from one of my kids last year. The large part of the pencil is a mailing tube, painted with silver and pink on the end to resemble the eraser part. A Styrofoam cone is glued on the end and painted to resemble the sharpened end of the pencil. The best part? It was filled with chocolate!!
I received this for Christmas last year and the candy lasted throughout the rest of the school year. (:
Another gift we receive a lot of is candles. I know many teachers love candles but due to allergies I can't use them unless they are unscented. Of course, this does make my fellow teachers happy when I give them mine (:
Great gifts for me would be cute holiday dish towels or snowmen Christmas ornaments are great. As well as notepads, post-its and gel pens. I love cute office supplies! Costume jewelry is okay as well, like little pumpkin pins or Easter bunny themed bracelets.
And you can never go wrong with live plants or boxes of candy! (:
What are some of your favorite teacher gifts?
How about things you would rather not receive?
Tuesday, September 17, 2013
DIY Dance Ribbons, PreK Style
Simple and inexpensive to make, these dance ribbons will last much longer than any you buy from a school supply store. Dollar store rubber/glitter bracelets and surveyor's tape is all that is needed to make these music props. I think the bracelets were packaged 5 for a dollar and the surveyor's tape I already had on hand but I did a search at Walmart.com and found rolls of 200 feet for less than $3.00 a roll. So you can make 10 of these for about $5.00. The "ribbon" is light weight and vinyl so it works really well even when cut fairly long and doesn't fray on the ends like traditional ribbon. The tape comes in many different bright colors so you can make them different colors or layer several colors on each one. They are very durable, I made these last year and they are still in good shape. Each ribbon is cut to about 3' but this can be very easily changed to fit your needs.
Monday, September 16, 2013
Meaningful Calendar Math, PreK Style
Lovin' our new Piggy Bank! We are working on one-to-one correspondence in relationship to our monthly calendar. We use real pennies and Velcro to attach them to our laminated piggy. This activity helps children draw that connection between the number and the amount of items that corresponds to it. For instance, on the 13th of the month we have 13 pennies in the piggy bank. First we figure out what the next number on our calendar is and then count our pennies to make to sure it is the same amount. Adding one each day except Mondays where we need to add three so they will stay equal. Then of course "check your math" by recounting the pennies and then looking at the calendar to see if it is showing the same number. I have seen children counting the pennies during center time and then moving to the calendar and pointing to the correct number. "See it's 13!"
Sunday, September 15, 2013
Rhyming Ball, PreK Style
Rhyming can be challenging for preschoolers so I use whatever methods I can to teach them the new concept. Turning a beach ball into a rhyming game definitely gets their attention and is always a lot of fun.
We start off by tossing the ball around the circle and trying to catch it. This will help them get that need to hit the ball hard when it comes toward them out of the way. (:
Then we're ready to rhyme!
I start by showing the kids each of the pictures and letting them tell me what they are. I want to make sure they are familiar with each word/picture before we start trying to rhyme. I want them to each be successful with this activity, so we also think of a couple of rhyming words as a group as we look at each picture.
Now it's time to start the game. I start by looking at a picture, reading the word and then a rhyming word. For example:
"house, mouse"
...then toss the ball to one of the kids. I choose someone I know will be successful and call their name as I toss it so everyone will know who is suppose to catch the ball and hopefully avoid ten kids jumping for the ball at the same time. (: Also, if they are successful then it will help to reinforce how the game is suppose to work and keep it moving in the right direction. I like to play this until each of the children have had at least one turn but will go as long as the kids are having fun and grasping the concept. If you have a particularly energetic class you can move this game outside to the playground as well.
Friday, September 13, 2013
PreK Word Books ~ Word Wall Alternative
So this year I decided to start making word books.
I originally thought of the traditional laminated pages to make our books, but then ran across some small dollar store picture albums that I already had on hand.
Homework bags brought in all of the material to make our book so all I had to do was add the pictures and items to index cards then label each one before inserting it into the photo page.
Our class homework each Wednesday is based on a letter or our theme. Children are to bring in items to share with the class that start with a certain letter. These items can be drawn, cut from magazines, pictures or actual items. So for the letter R this week we had a wide variety of items including stuffed rabbits, red race cars, rocks, rice and lots more. I always send all of the items back home (taking pictures of items as needed), but keep artwork and magazine pictures to make our books.
These are so much better than word walls for my preschoolers because they can search through the books until they find the word they want to write, open the book right beside their paper on the table and begin copying the word. This method is much easier than with the words on the wall, which is often no where near a table.
The kids also like the fact that these are the pictures they brought to school. Having ownership in the project will give them some encouragement to share their pictures with their classmates.
Word books can of course can be used in your classroom library as well, but I really like them in the writing center. As we get more made I may put some of them in a basket and move them to the library. The kids could still get them out of the basket and take them to the table to write.
Lots of possibilities... (:
Thursday, September 12, 2013
Writing Journals, PreK Style
* Crayons
* Markers (Fat & Skinny)
* Ink Pens (Variety of colors & styles)
* Colored Pencils * Regular Pencils
Now provide them with things to write. Name cards, labelled flash cards such as the ones in the picture, magazines, books or word wall words are all great places for kids to find words to write.
Once again those note cards and post it notes I keep around the classroom are good to jot down any word a child is wanting to know how to spell. Then let him/her keep the card in their journal or cubbie in case they want to write it again.
Wednesday, September 11, 2013
Fine Motor Cutting Activity, PreK Style
Often times children come into my classroom who have never had a pair of scissors in their hands.
Parents are afraid of scissors when it comes to their preschoolers, with visions of cut pigtails, holes in shirts and perhaps a new haircut for the cat. Every year I hear "We don't let him/her have scissors"! So it is our job to let these now overanxious kids explore the previously "untouchable" scissors. Usually this starts with teaching them not just how to cut a straight line, but how to hold the scissors.
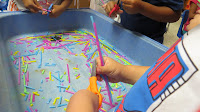
Upside down, backwards, wrong hand, two handed... I seen it all this morning. When we finally got that figured out, they all did a great job cutting and making these straws fly across the room. One of my absolute favorite cutting activities, this is always a hit with the kids. If you have never snipped straws with a pair of scissors, you should try it next time you get a chance. Little snips work the best and is what we are trying
to encourage here. Just strengthening those little hands by opening and closing the scissors.
All I did after everyone was holding their scissors "thumbs up" was sit back and take notes. (: The rest they did themselves. Encouraged by a more skilled classmate to make those straws fly a little further, each child quickly mastered the straw snipping.
A few more tidbits about this activity:
* Restaurants will usually donate boxes of straws to your classroom.
* Use the cut straws to extend this activity and continue working on those fine motor skills by adding pipe cleaners, yarn and maybe a few beads to string.
Then there is patterning, comparing sizes, and colors and.... well you get the idea.
Happy Wednesday (:
Tuesday, September 10, 2013
Documenting Kids Artwork, PreK Style
I keep note cards in several places in my classroom for quick anecdotal notes, general messages, reminders and of course for documenting children's artwork. They also fit nicely in my pocket without getting all wrinkled up like scraps of paper.
Some important things to remember when documenting children's artwork:
* Name & Date on all papers to make sure they get properly filed in portfolios later.
* Medium - I don't always do this but it helps parents and others know a little more about how this artwork was created and helps with those open-ended questions when talking with the child about their work.
* Try to write exactly what the child says about their work and not to add your own words... It may not make sense to you, but it absolutely makes sense to that child and maybe to others who read the documentation.
* Never write on a child's artwork unless you ask them if you can and even then I try to never do this. If a parent wants to frame their child's picture, it would look much nicer without black sharpie notes written across the top of it. It also shows the children that you respect their work and don't want to "mess it up". I prefer the note card stapled to the picture or even better taped to the wall under the artwork if you have it up and on display. My only problem with this is losing track of the note card if it is not attached in some way. If the picture is going straight in the child's portfolio I sometimes tape the card on the back of the picture, which is a good alternative as well.
One more tidbit: I know children often make great artwork that you really want to display in the classroom or add to their portfolio BUT they really want to take it home immediately to show mom. Right? We've all been there. What do you do? Encourage them to make another one "just like" the first one? Beg them to leave the picture at school "for just a little while" and hope they forget about it? lol Your best bet is to either make a photocopy of the artwork (with a color copier if possible) or take a picture of it. These work great in your art gallery (even great works of art are sold as prints) and in the child's portfolio. After a trip to the copier with the child in tow if possible I even ask the child if they want the one they made to take home or the copy we just made. You would be surprised how often they want to take the copy. (:
Happy documenting!
Monday, September 9, 2013
DIY Homemade Blocks, PreK Style
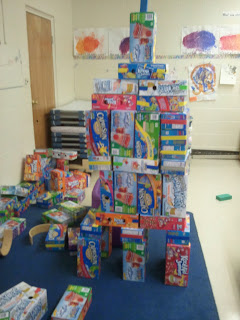
My love of boxes continues...lol Sturdy and colorful, these juice boxes are a perfect fit for a preschool classroom.
Parents love to help you with collections of things especially if it's a recycling project. I used colored duct tape to seal the ends of the boxes to make them just a little sturdier and hold up to a classroom full of 4 and 5-year-olds.
When a box gets mangled it simply gets thrown away and new ones soon take it's place. I had over 100 of these cardboard "blocks" until I changed classrooms last year, which is great for 3 or 4 kids to build really nice structures.
Pizza boxes, new ones donated from restaurants, work great for this as well and are nice because they come in different sizes. It would be great to get them donated from several different pizza shops so the kids could compare them.
Cereal boxes are probably the kids favorite because they love to look at the various kinds of cereal. However, with cereal boxes I had to stuff them with wadded up sheets of newspaper to make them a little sturdier and they didn't last as long because of the thinner cardboard.
Hope this give you some ideas about how to make homemade blocks for your block center.
Happy Monday! (: